A pothole in your driveway is a half-hour DIY job, not a contractor visit. Cold patch costs 10 to 15 dollars per bag and works without temperature, only compaction. The trick is squaring the edges and tamping every lift. This guide walks the full process so the patch stays put through summer heat and winter freeze. For wider repair scope, see how to repair an asphalt driveway.
What you need
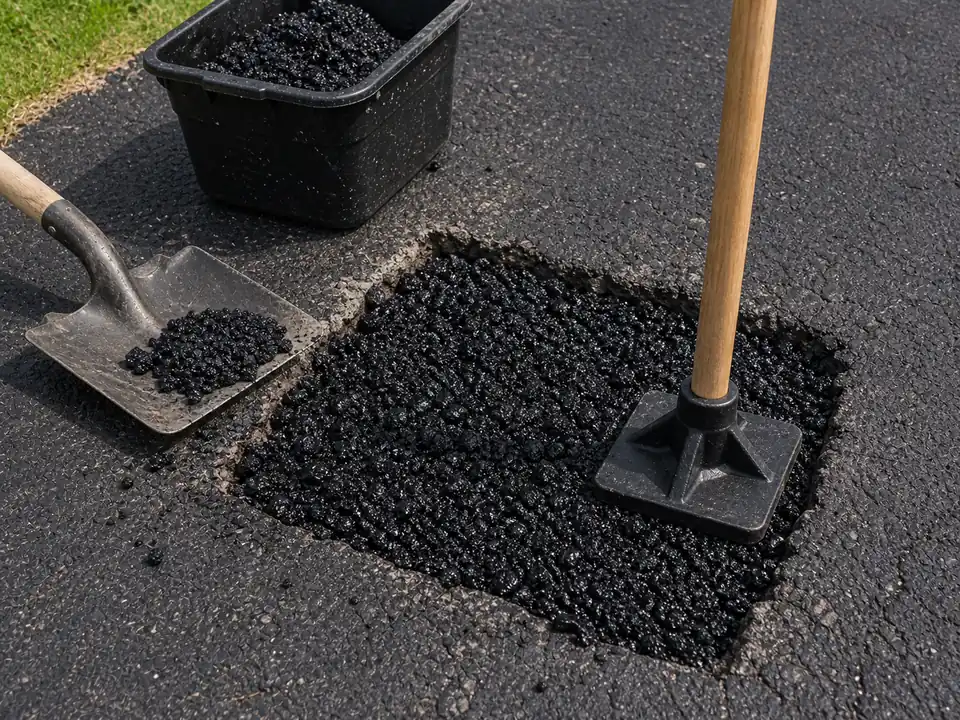
- Cold patch asphalt: 50 lb bags from any hardware store. About 10 to 15 dollars. One bag covers roughly 6 by 12 by 2 inches of hole.
- Tack coat or asphalt emulsion (optional): For deeper holes. Improves bond. About 8 to 15 dollars.
- Stiff broom and wire brush: Cleaning the hole.
- Square shovel or trowel: Spreading the patch.
- Hand tamper or plate compactor: Compacting each lift. A vehicle tire over a piece of plywood works as a substitute.
- Saw or chisel: Squaring the edges of the hole.
Step 1: Clean the hole
Pull out all loose asphalt, dirt, weeds, and crumbling material. Use a stiff broom, then a wire brush. Cold patch only bonds to clean, solid surfaces. Skipping this step is the top reason patches pop out.
Step 2: Square the edges
Use a saw or chisel to make the edges of the hole vertical. Feathered edges (where the asphalt thins toward zero) break out under tire load and take the patch with them. Square edges hold the patch in place mechanically. The Federal Highway Administration uses square-edge prep as standard practice on highway pothole patches for the same reason.
Step 3: Apply tack coat (optional, deeper holes)
For holes deeper than 2 inches, brush a thin layer of tack coat or asphalt emulsion on the bottom and inside walls of the hole. This makes the cold patch bond chemically as well as mechanically. Skip for shallow holes; the compaction alone holds.
Step 4: Fill in 1 to 2 inch lifts
Pour cold patch into the hole. Spread evenly. Do not fill the whole hole in one pour. Build the patch in 1 to 2 inch lifts. Each lift needs its own compaction.
Step 5: Compact each lift
Use a hand tamper, plate compactor, or drive the tire of a vehicle slowly over a piece of plywood placed over the patch. Compact until the surface stops moving and feels solid under the tool. Under-compaction is the second most common reason patches fail.
Step 6: Crown the final lift
For the final lift, overfill so the patch stands about 1/4 inch above the surrounding asphalt. Compaction will press it flush. A patch tamped flat with the surface ends up below the surface as it settles, which holds water and ages out fast.
Step 7: Final compaction
Compact the final lift hard. Drive over it slowly with a vehicle several times in different directions. The patch should sit flush with the surrounding surface, not crown above it and not dip below.
Step 8: Cure and use
Cold patch is drivable immediately. Avoid sharp turning over the patch for the first few days. Full cure takes weeks. The patch hardens with traffic, so light driving over it actually helps. Hot weather speeds the cure. Cool damp weather slows it. The Asphalt Institute publishes the same lift-and-compact procedure as their standard recommendation for permanent cold patches.
Common pothole patching mistakes
- Filling without cleaning. Patches pop out within months.
- Feathered edges. Patches break out under tire load.
- One thick lift instead of multiple thin lifts. Inner sections never compact.
- Tamping flat without crowning. Settles into a low spot that holds water.
- Patching alligator cracking. Cosmetic only. The base under it has failed.
For the wider list, see our DIY sealcoating mistakes roundup (which also covers patching mistakes adjacent to sealcoat prep).
When the same pothole keeps coming back
If the same hole opens again every spring, the base under it has failed. Surface patching is cosmetic at that point. The real fix is cut-out repair: saw out the section, dig down, replace the failed base material, then re-pave. This is contractor work. If recurring potholes cover a meaningful area, it may be time for an overlay or full tear-out. Once the surface is sound again, learn how to prevent potholes so the same spots do not fail next winter.
Cost summary
- One small pothole: 10 to 15 dollars in cold patch. 30 to 45 minutes.
- Three or four potholes: 30 to 60 dollars. 1 to 2 hours.
- Cut-out repair (contractor): 300 to 1,200 dollars depending on size.
References for the lift depths, compaction guidance, and product chemistry are on the sources page.