Sealing an asphalt driveway is one of the few paving jobs where DIY beats hiring out on cost without giving up much on quality. The skill needed is real but not advanced. The tools are cheap. And the result lasts 2 to 4 years if you do the prep right. This guide walks the full process. Plan gallons first with the asphalt sealer calculator, then time the job with our when to sealcoat rule.
What you need
- Sealer. Asphalt-emulsion sealer in 5 gallon pails. One pail covers 250 to 400 square feet per coat. Plan two coats. See our coal tar vs asphalt emulsion sealer comparison if you are picking a product. The USGS coal tar sealcoat fact sheet is worth reading first if you live in a state that has not yet banned coal tar.
- Crack filler. Pourable for hairline cracks. Rubberized for 1/4 inch and wider. About 5 to 12 dollars per bottle.
- Oil spot primer. Only if you have stained areas. About 10 to 20 dollars.
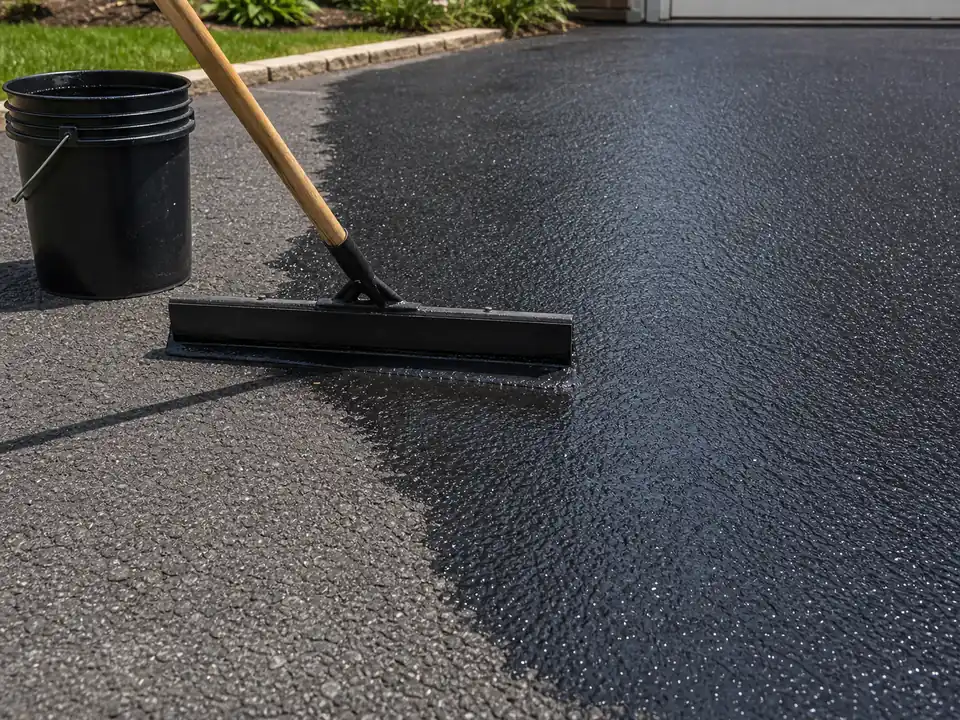
- Squeegee or driveway sealer roller. 18 to 36 inch driveway squeegee with foam edge. Or a long-nap roller for smaller jobs.
- Push broom and wire brush. For surface prep.
- Garden hose, or pressure washer on a wide tip.
Step 1: Pick the right day
Wait for two clear, mild days back to back. Daytime highs above 50 degrees Fahrenheit, no rain in the 24 hour forecast, and a dry surface. The National Asphalt Pavement Association recommends air and surface temperatures above 50 degrees Fahrenheit and rising for proper cure. Avoid hot direct sun above about 90 degrees on a black surface. The sealer flashes off and leaves a thin uneven film.
Step 2: Clean the surface
- Sweep the whole driveway with a stiff push broom.
- Pull weeds out of cracks and joints.
- Wash the surface with a garden hose or a pressure washer on a wide fan tip.
- Let everything dry fully. The surface must be bone dry before sealer goes down.
Skipping this step is the single most common cause of a sealcoat that peels in the first season.
Step 3: Treat oil stains and fill cracks
Sealer does not bond over oil-saturated asphalt. Clean stains first with the method in our oil stain removal guide. For heavy contamination, brush on an oil-spot primer. Then fill any cracks wider than hairline using the right product per crack type, covered in our crack repair guide. Let crack filler cure per the label, usually 24 to 72 hours, before sealing on top. If grass or weeds have rooted in any crack, pull or kill them first; sealer over a live root gets pushed straight back through. Our weeds in driveway cracks guide covers no-damage removal.
Step 4: Cut the edges
Pour a thin line of sealer along all edges, joints, and the garage threshold. Brush it in to about 6 inches wide. This way the squeegee never has to touch grass, sidewalk, or concrete edges. Cutting in is the technique that separates a clean DIY job from a messy one.
Step 5: Apply coat one
- Stir the pail well. Sealer settles fast.
- Pour a snake of sealer across the driveway, about 6 inches wide.
- Spread it with a squeegee in one direction. Keep the coat thin and even. You should see the surface texture through the wet sealer.
- Move backwards as you work, away from the dry section, so you do not step on what you just sealed.
- End at a clean edge: the street, a sidewalk, or the garage door.
Step 6: Wait, then apply coat two
Let coat one dry per the product label. Usually 4 to 8 hours, longer in cool damp weather. Apply coat two perpendicular to coat one. So if coat one ran left-to-right, coat two runs front-to-back. Two thin perpendicular coats give better coverage than one heavy coat. Heavy coats also crack on their own.
Step 7: Dry and rope off
- Foot traffic: 4 to 8 hours per coat.
- Car traffic: 24 to 48 hours after the final coat.
- Trailer or RV jacks: Wait at least 30 days. Point loads can dent fresh sealer.
Tape off the apron with cones or string. The first vehicle on a not-quite-cured sealcoat leaves visible tire marks that never fully fade.
Common DIY sealing mistakes
The full list is in our DIY sealcoating mistakes roundup. The biggest five:
- Sealing too soon on new asphalt. Wait 6 to 12 months after install.
- Skipping the clean step. Dust kills the bond.
- Applying too thick. One heavy coat cracks on its own.
- Sealing over un-filled cracks. The sealer cracks at the same lines.
- Sealing in the wrong weather. Below 50 or above 90 degrees both fail.
- Sealing too often. Yearly coats build up and crack in an alligator pattern.
How much does DIY sealing actually cost?
For a typical 1,000 sq ft driveway, expect 100 to 250 dollars in materials for two coats, plus prep supplies. A contractor for the same job runs 400 to 800 dollars. The DIY saving is real, but it depends on the surface being sound to start with. If your driveway has alligator cracking or pumping sections, sealing is cosmetic only and the right path is overlay or tear-out.
References for the timing, coverage, and product chemistry above are on the sources page.